
Clutchmasters Twin-Disc for 3S/5S
ClutchMasters Twin-Disc for 2GR
Please note we are currenly scheduling cars for March. If you place an order for a swap, we will reach out to you to sort out the details. You may email us at sales@atsracing.net with any questions.
.jpg)
Got an old ATS ROM Tune and thinking of upgrading to a full stand alone? ATS is offering $500 credit for your old rom tune when your purchase a Link or ECUMAster stand alone ecu, or any of our stand alone combos. I am currently working to add this option to the options menues on all the ECU's and pacjages on the site, but if you see one I missed please email us at sales@atsracing.net Just purchase normally on the website, check the rom tune trade in option and then ship us your old ecu. Once we get it we will ship your new stand alone ecu.
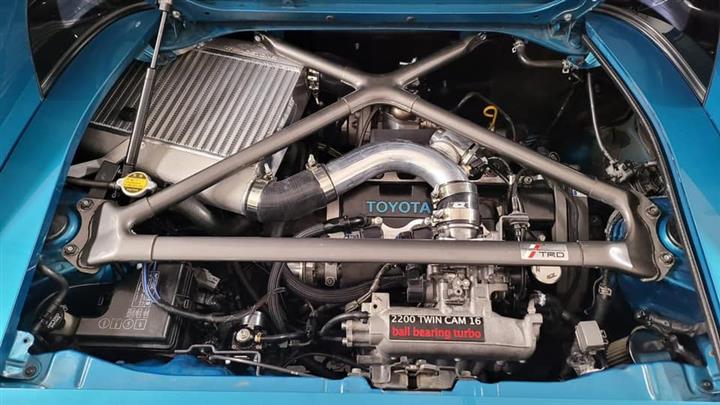
The 2GRFE 3.5 liter V6 has been finding its way into the MR2 platform for almost a decade now. With the support of great vendors like Frankenstein, Wilhelm, TCS, and ATS we have seen an absolute surge in popularity. Now it is relatively easy to achieve 280whp/350 horsepower with a bolt in swap. 280whp may sound like old school Gen3 3SGTE power numbers, but the drag strip times (and road course times) are reminding us that it is power under the curve, not just peak numbers. At NA2022 we saw Caleb Purdy and Lee Perez race down the 1/4 mile side by side for 10-15 passes. Caleb would win one, Lee would win the next two, then Caleb again. I don't recall who tallied the most wins, but the times were almost identical in ET and trap speed. Caleb's car is a 2GRFE swap. Lee's setup at the time was a proven 350whp gen5 3SGTE setup with standalone ecu and a CT16 turbo upgrade.
The thought of 280whp does not quicken the pulse of the 450whp four cylinder guys. Launce Bennett set the compressor wheel in motion when he asked ATS Racing to turbo his 2GRFE. The initial results were great, almost 500whp on pump gas. That's a number that previously required E85 or race fuel on a four cylinder. When we switched to E85 (and a better intercooler) we saw 650whp. We've done over a dozen of these now. Each one making over 600whp. We even flew to TCS in 2023 to tune Ty's personal 2GRFE turbo car. But don't misunderstand, at this level the stock 2GRFE is very unforgiving. One mistake in tuning can be disastrous. At ATS we tend to push our own cars harder than client cars, especially me. If something is going to fail, I want it to happen to me and not a client. Collectively we have destroyed at least five 2GRFEs. The good news is we are learning from each one so that we can offer a better product.
So you are finally getting to the meat of this blog entry:
Rods - these aren't gen2 3SGTE rods. More like Gen4/5 rods.
How we cope: using rpm dependent boost control we limit peak torque. Or aftermarket rods, we still use rpm dependent boost for traction reasons, but Aaron's car saw 700lb ft of torque at 5000rpm recently.
What's the safe number on a stock rod? about 500lb ft.
Piston rings - The ring gaps are TIGHT and don't cope well with the additional heat from the turbo. The heat causes them to expand, then the ends touch tips aggressively. Then the ring buckles and cracks the piston.
How we cope: On pump gas we have to run an extremely rich mixture to keep cylinder temps low. E85 is a HUGE help. We still run it a little rich for safety though. Another solution is to pull the pistons out of the block, regap the rings to a larger value and reinstall. It's free (except head gaskets and head studs) if you are DIY, but labor intensive.
What's the safe number? - 500whp on pump gas is safe on the street, it's even safe on a 1/8 mile drag strip. I don't think it's safe on a full 1/4 mile pass. On Ethanol it's basically a non-issue.
Pistons - not only are the ring gaps TIGHT, but so are the clearances between the piston and the cylinder wall. Proper care has to be taken to make sure the car is fully warmed up before driven hard. What happens is the pistons heat up faster than the cylinders, so the pistons grow slightly. If you put too much heat in them too soon the pistons will expand until it touches the cylinder wall. Best case this causes mild scoring. Worse case this causes enough scoring that aluminum is scraped off and lands in the ring area and jams up the rings. This causes a loss of compression and is basically fatal to the block and pistons.
How do we cope: Let the car warm up fully before aggressive use.
What's the safe number? - Not really an issue once fully warmed up
A great way to solve the piston and piston ring issue is to upgrade to forged pistons. You'll end up with a much stronger package overall.
Valvetrain 1 - This isn't the high RPM flawless valve train of the 3SGTE. It's got rocker arms and high efficiency valve springs.
How we cope - our initial solution was the MWR upgraded lifters and clips only. We still saw a few people throw a rocker off, but no catastrophic failures, and we were able to reinstall the parts and restore performance.
What's the safe number: about 7200-7400rpm. The lifters and clips seem to be worth an extra 200rpm though.
Valvetrain 2 - on some of the turbo cars we see a weird dip right around 6000-6500rpm. Some cars recover quickly from it, some don't. Aaron's car was one of the worst. I should mention here that there are at least three different 2GR valve train setups, there are wide rockers, skinny rockers, probably multiple valve spring revisions etc. I have yet to find a pattern to exactly what motor has what. None are that great so I don't see a point in trying to find a donor engine that came from a blue Sienna made on a Tuesday because it's supposed to have these "best" valvetrain.
How we cope - we tried a number of things, eventually we discovered it is valve float. Why it happens at that rpm and how it recovered at a higher rpm is a mystery to me. My guess is that it's some sort of harmonic in the valve spring. The good news is that upgraded valve springs solved the issue.
Head bolts - these are one time use. Seriously. Don't buy off-brand bolts either. I found this out in an expensive way. If you need new ones just jump up to ARP head studs.
Where we are now: I sold my 800+whp 2.3 superstroker setup in 2022. It is an amazing drivetrain package and bulletproof at that power level. But the big cams, huge injectors, massive cam overlap, not enough vacuum for the brakes to work right, etc caused a bunch of sacrifices in driveability. The 2GRFE Turbo package even at 750whp still idles and cruises like a stock camry! The only issue I have is that a twin disk clutch is required at this power level. The low end torque right off idle does make that MUCH EASIER to deal with however.
My current 2GRFE engine is the following:
Wiseco stock bore, stock compression pistons - these are a drop in piston that does not require months of waiting at the machine shop. However I am seeing a little smoke on start up from the larger ring gaps and loose pistons. Small sacrifice IMO
BC rods
MWR valve springs
MWR lifters and clips - not 100% sure if these are necessary with the valve springs, but I know they are compatible at this pointARP head studs
Felpro head gaskets - we may look into a different head gasket with larger cooling passages in the future, but so far so good with this one
Clutchmaster twin disk clutch (street version with steel flywheel)
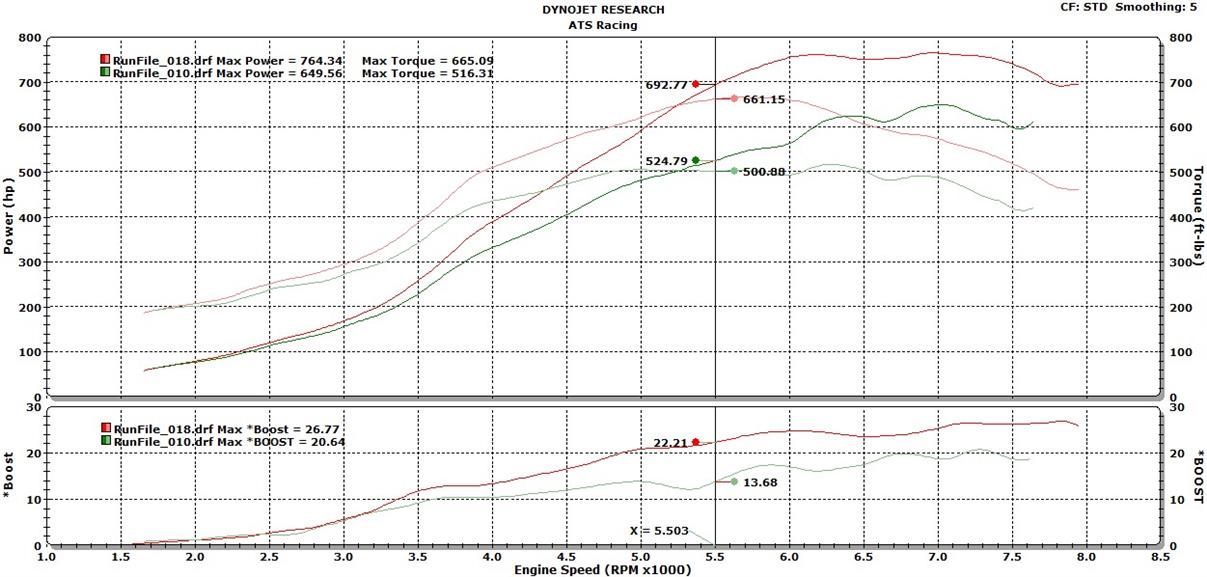
I'm pretty confident this is a 900whp capable setup except I would need a larger turbo, larger cams, and probably one of Marc's billet intake manifolds. Instead we used the upgraded parts to run the boost in sooner giving us a massive 160lb ft boost of torque at 5500rpm. As it is right now it's a 750whp BEAST that my wife is happy to jump in and drive. Below is a comparison of my old setup (stock long block with lifters and clips) in green versus the current "built motor" setup in red.
.jpg)
In 2023, we've completed over 20 MR2 engine swaps including 2GR, 2ZR and 2AR!
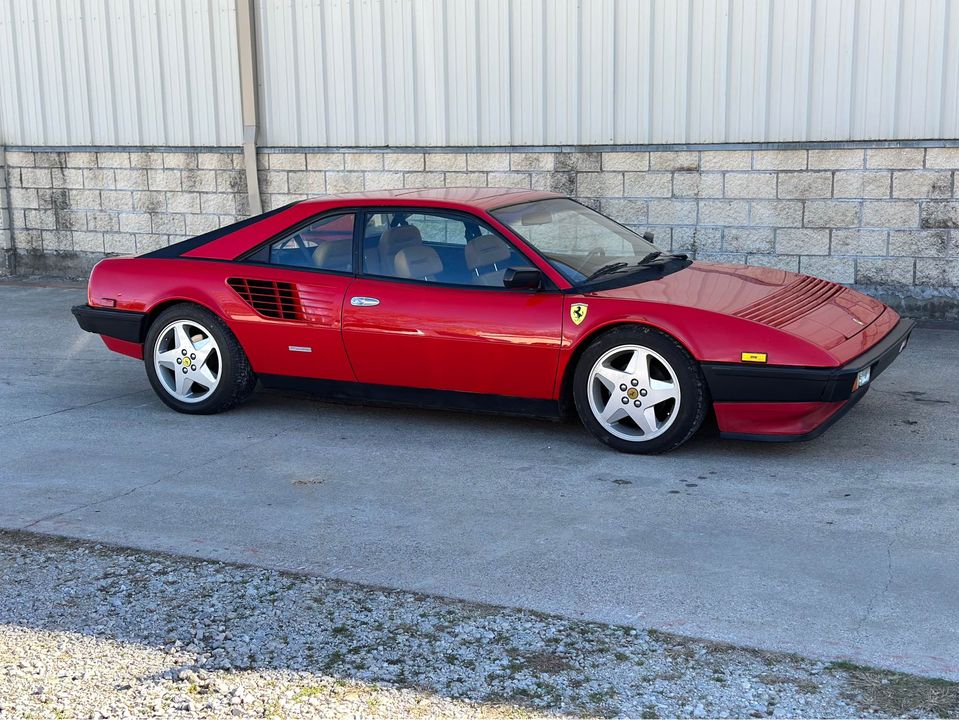

It’s a fairly low mileage car. Around 36k miles if I remember right. I love it, I finally feel I have taken the project as far as I can, and I want to make room for new project cars (hint: I bought a silver 308GTB).
Example to typical Mondial driver's day:

Not my actual car. Well, it could be, but this was not during my ownership.
More about the car:
82 Mondial 8 red on tan. Interior is very nice. Both front seat bottoms have been recovered and are in great shape.
All the gauges work, but the tachometer occasionally requires that you tap it with your finger after starting, like Fonzie hitting the jukebox.
Radiator has been replaced with aftermarket aluminum unit and DUAL high performance fans that are significantly lighter than the original parts. Plus a lower temp fan switch. So no overheating issues.
Coolant expansion tank has been replaced with an aluminum one (no more leaks!)
AC compressor has been upgraded to the SANDEN unit and blows cold. Although “blows” is kind of an aggressive term for Mondial airflow. Add some ceramic window tint and you’ll survive summer.
Shocks have been replaced with custom adjustable coilovers and is lowered about 1.5 inches from stock. The ride height and dampening is fully adjustable. If your steep driveway can’t handle the current level of sexiness the car can be raise up by adjusting the spring perches. Spring rates are stiffer than original, but still very comfortable.
Between the radiator, fans, AC compressor, and coilovers we have shaved over 100lbs off the curb weight.
Wheels/tires are from a 348. Original wheels/TRX tires can also be included. Tires are new. All season, not extreme summer only tires. Plenty of grip for a 40 year old Ferrari.
Timing belts, valve cover gaskets, cam seals, and crankshaft seal were all done two years ago and have under 1000 miles on them. I’m a 5-6 year belt guy so that doesn’t bother me. The clutch was recently replaced too. I used the V12 “Daytona” pressure plate to hold the extra power. Pedal pressure is about 15% higher than the stock clutch but still very light. The rear main oil seal was replaced at the same time as the clutch.
The transmission shifts amazing. Honestly it’s better than my cherished 308. The clicky-clack of the gated shifter at 7400rpm is just intoxicating.
The power windows have “boosters” installed. They work great. The sunroof works too!! The power antenna is not working. I think the gear inside stripped. Fortunately out of the quattro of power accessories the antenna is the cheapest.
The glovebox release is electric and is currently stuck shut. I can’t remember if I ever had it open. It might be full of cocaine or other treasures from a previous owner.
The electric fuel door release does not work….wait, maybe the key has to be on for it to work? That’s how my 348 is. Anyway, I just pop the engine lid and pull the manual fuel door release. Plus that reminds me to check the oil when getting gas.
Simple JVC Bluetooth head unit and four vintage speakers (alpine or pioneer). I haven’t turned the radio on in two years, prefer Ferrari motor sounds, blah blah blah.
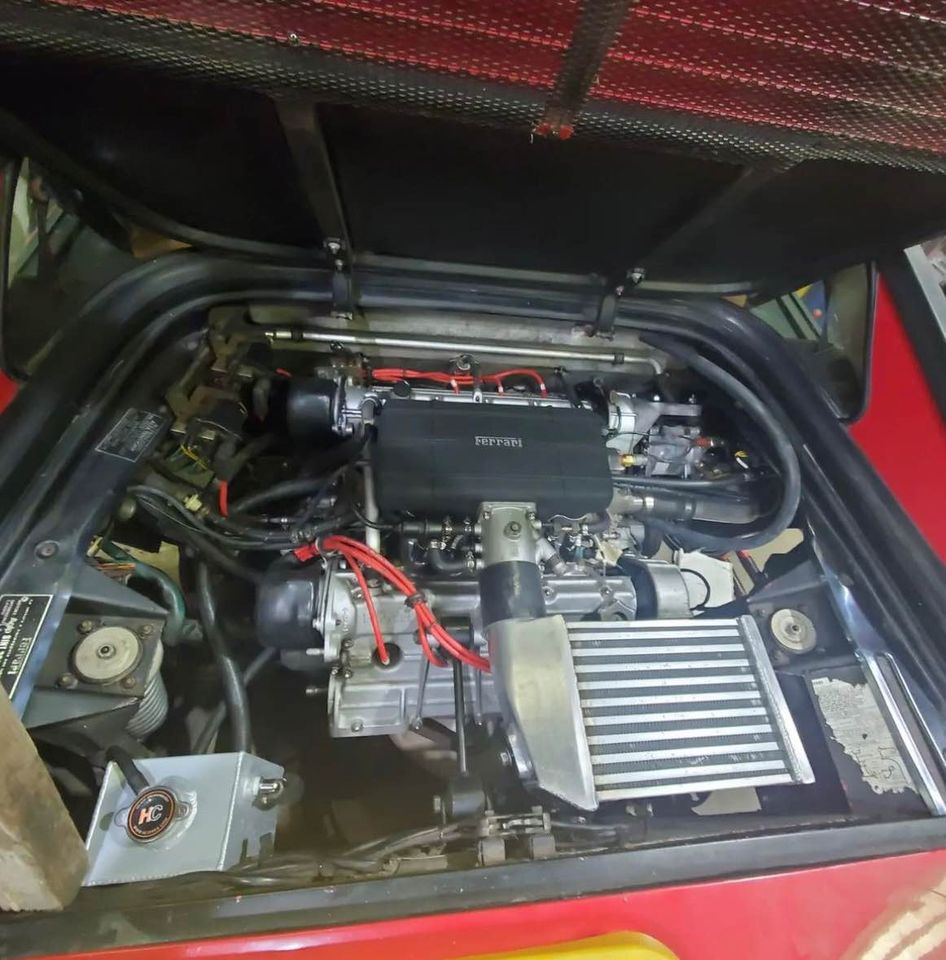
Turbo kit makes it FAST. Non car people can stop reading here. The custom kit uses a Comp oilless, ball bearing 5858 T3/T4 size turbo and a 44mm Tial external wastegate. The turbo needs to be lubed with about five pumps from a special grease gun every 3000 miles (will be included with the car). Think of it as one extra step during an oil change. The car makes ~400 horsepower on 93 pump gas. It’s even faster on ethanol, keep reading. I would call this reliable under anything short of road course track day type conditions. Would I try to go 169mph on pump gas? no. Would I do a couple of 0-100mph acceleration runs? yes. What if you want to run a road course? Use ethanol and disconnect the boost control solenoid.
The antique mechanical fuel injection has been replaced with modern electronic fuel injection and ignition from ECUMaster. I used eight 50lb high impedance injectors from Racetronics and installed an additional fuel injector between the intercooler and the intake manifold. This provides an additional benefit of cooling the air charge through the latent heat of vaporization. There is an air to air intercooler.
The notoriously unreliable digiplex ignition boxes were also replaced by the ECUMaster programmable ecu. It runs the fuel injectors, ignition map, the additional injector, and the boost control. It has a flex fuel sensor so the engine can run on E85, 91 (or better) pump gas or any mix of the two. The ecu does all the calculations automatically. I have also added an intake sensor that can add or reduce boost or ignition timing based on intake air temperature. Basically just a fail safe.
I also added a data logger that stores all engine events on a memory card. If you run into an issue just pull the card, slip it in your laptop and send me the last couple of files with a description of what you felt or saw. Pretty high tech stuff.
And why would you want to run ethanol? Oh, just another 100 horsepower! The higher octane of the ethanol allows more boost, and of course I optimized the tuning to take advantage of that.
The entire turbo package is hidden behind the stock exhaust diaper, so it’s a sleeper.
I still have the original air filter box, muffler, and intake hoses. So putting it back to its slow ass original condition would be fairly easy. You would need a short section of exhaust made between the manifolds and the muffler (usually called test pipes).
Ferrari would have labeled this a 400 horsepower car in 1982. And that’s on pump gas. On Ethanol it’s 500 horsepower!
Known flaws: There are a couple thin spots in the paint on the engine lid and trunk lid. See last photos. The driver’s door has to be shut pretty hard to fully latch (but the car seals up well and is very quiet on the freeway). There is a small ding on the passenger side rear fender. A small piece of the ugly US bumper is missing on the rear driver’s side. The driver’s side a-pillar has some crazing in the paint. Carpet up front shows some wear (as typical of lighter colored carpet). It has a set of nice custom floor mats, I should have bought black instead of beige.
I owned this car for about six years. I’m not your typical Ferrari flipper, these are my children and I want them to go to good homes. My modified Ferraris carry an excellent reputation in the industry. Google “turbo Ferrari 308” and you’ll find multiple articles on my blue 308 (that will never be for sale).
Youtube video with walk around and short drive:
https://www.youtube.com/watch?v=kjYxn3VwqMo&ab_channel=ATSRacing
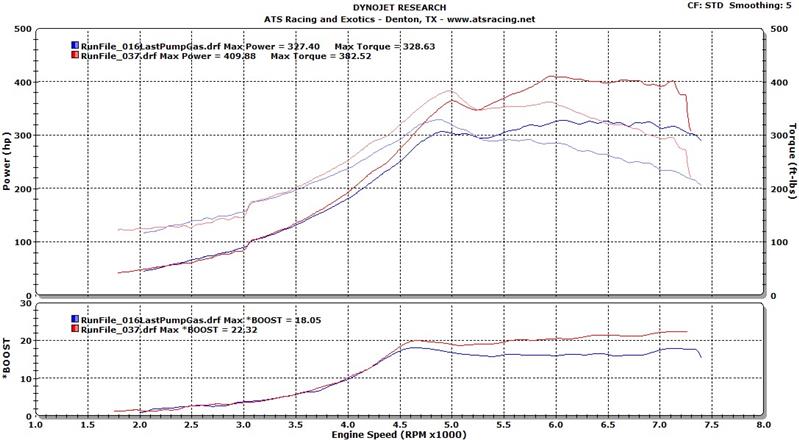
Dyno Sheet:
While doing construction and organization at ATS I managed to find parts to build FIVE rom tunes, and maybe as many as eight. It depends on some decription stuff we are working on. So we are putting these together in an awesome CT27 combo that will include the following items:
ROM Tune - Gen2 only
These will be loaded with our custom maps, 7600rm rev limiters, no boost/fuel cut, no speed limiter. They are available for 91-92 US cars, 93-95 US cars and 91-93 JDM cars. I will need to know your stock ecu part number in advance, but there is no core charge!
CT27 turbocharger
These will be loaded up with options too, like our new 1 bar adjustable pre-load wastegate actuators, ported wastegate, ATS billet water plate and of course our proprietary modifications to the turbine and compressor housings and our billet compressor wheel.
ATS modified side feed fuel rail - these are bored out from the factory 6mm to 8mm as well as ported for optimal flow
ATS modified and blueprinted fuel pressure regulator - upping the bas pressure from 42psi to 49psi makes the stock injectors behave like 500cc injectors!
170 degree thermostat - keeping cylinder heads cooler is a common trick to reduce detonation and to increase air density inside the intake runners
Walbro 255 fuel pump
You will also want to get these items sold seperately:
3" downpipe
3" exhaust: TCS Motorsports Single Muffler Dual Exhaust or TCS Motorsports Dual Muffler Exhaust or ebay 3" dual exhaust
intake/air filter: TCS 3" 3SGTE Air Intake Kit
Upgraded intercooler
on 91 octane we typically see 265whp at 16psi
on 93 octane we typically see 280whp at 17psi
on 98 octane (mix race fuel and pump gas) we see 310-320whp (that's 400 flywheel, basically DOUBLE the stock horsepower) at 21psi
We just had the back parking lot regraveled and installed a large carport. We have approximately five covered parking spots still available. If your car is here and waiting for service, covered storage is available for $150/month. If your service/work is done and you have paid your bill in full, covered storage is available for the same $150/month rate. If your car is ready to pick up and you have not paid your bill then you are not eligible for covered storage and our standard storage rate of $30/calendar day will be added to your bill starting three days after completion. Thanks.
300whp goals
I'm sure there is an earlier blog entry on this, but as time changes, new products come out, old products disappear, etc, etc the list changes.
One of the most common goals we see for a MR2 is “What does it take to reach 300whp?” Twenty years ago (yes, I have been doing this THAT long), the list involved a full rebuild and a lot of luck and witchcraft. Today it has been done so many times that it's much simpler:
Gen2, 3, 4, 5 cheapest path:
ATS CT16, 21, or 27
Billet Wastegate option
Ported wastegate option
3” exhaust ($200 ebay is fine)
3” downpipe
550cc injectors (these are standard on gen3,4,5)
GENUINE Walbro Fuel pump – This is the largest pump you can use with the stock fuel pressure regulator
Bored fuel rail – gen2 only
Side mount intercooler with 9” ATS fan and shrouds
Stand alone ecu with the following options:
boost control
knock control
wideband
We sell and support Link and ECUMaster ECU's. You may use another brand depending on your tuner's choice. We offer remote tuning for Link and ECUMaster.
Now comes the tricky part. You are going to need to run about 17psi at 6100rpm at about 18 degrees of ignition timing. What's so hard about that? Well, not all motors can do it. Some of these, Gen2 especially are 200,000 mile motors that have been running a bad stock tune on a worn out AFM for ten years and have an incredible amount of carbon built up inside them. This carbon creates hot spots, increases compression ratio, and dramatically increases the octane needs of the engine.
There are lots of brands and models of ECU's out there. I won't take the time to list them or even attempt tp rank them. We carry Link and ECUMaster. We have worked with both brands for many years and their products are of high quality, very reasonably priced and very reliable. Here are some differences to help you choose between PNP options:
MAP sensor - the ECUMaster Classic and Black have a built in 4 bar MAP sensor. The Link does not. If you have a GEN3/4/5 it's usually not a big deal as they come with a 2.9bar/27psi MAP sensor from the factory. But a Gen2 map sensor is only 2.2bar/17psi and can't do high boost. So there is an additional cost.
Wideband O2 - again this is built into the ECUMaster products (LSU4.2 on Classic and 4.2/4.9 on the Black). You will still need a sensor and a cable, we sell these for $150. ECUMaster can also use an external wideband. Link PNP requires an external wideband. Now you may already have a wideband installed on your car so the additional cost won't matter. But we have recently run into cars using some really junky widebands. Innovate has always been awful and unfortunately we are starting to see failures from the previously reliable AEM wideband. We still like PLX and Zeitronix widebands.
Datalogging - by now you thought this was just an advertisement for ECUMaster over Link - not so. the Link PNP ecu's have on board data logging memory. Meaning you do not have to have a laptop connected for the ecu to record a log. You can attach the laptop later (about an hour max) and download the logged data. Neither ECUMaster unit has onboard memory, but they do sell a cool device that records to an SD card. I have them one on my MK1 SC and it's really convenient. Plus the amount of memory available is HUGE. Cost is around $200 (I'll get them on the website later today).
Plug and Play type - the ECUMaster uses a pnp adapter box (designed by ATS Racing) so it's a little bulkier looking. But the advantage is that you can easily hook up accessories (like flex fuel) directly to the ecu. The LInk is cool because it fits inside the stock ECU case and looks 100% original to the car. However, to attach additional accessories requires an expansion cable (around $35). ECUMaster has PNP options for gen 2, 3, and 4. Link has PNP options for gen2, and 3 and there are some higher cost aftermarket options for gen4 and even gen5 (about $350 more). Here is another crazy thing...there is an upcoming PNP adapter that can use the Link PNP on a 2GR V6. I'm guessing final price will be around $1000 if you already have a Link ECU.
Throttle by wire - we are seeing more and more of this option used lately. EMU Classic can do it but requires an expensive external module that probably uses up too many of your inputs and outputs. The EMU Black can do it right out of the box and the Link PNP can do it but needs to be modified (either sent to Link or DIY and void the warranty) or an external module.
So what did I chose? well a little of everything....
1991 MR2 1000hp 5SGTE - EMU Classic with the memory card logger
1988 4AGZE MK1 - EMU Classic with the memory card logger - we offer a PNP option for the ECUMaster and the 4AGZE
1978 Ferrari 308 turbo - Link Storm with the external throttle by wire module (today I would just choose an Extreme) - I went for this because I wanted full sequential injection and coil on plug for 8 cylinders
1982 Ferrari Mondial 8 turbo - EMU Classic - I kept the dual distributors and was ugrading from CIS (constant injection system) so even batch fire was an upgrade. If you are going to wire it instead of PNP this is the cheapest option.
1991 MR2 2GR V6 Turbo and non-Turbo - Link Extreme if doing a custom harness or Link PNP option (contact us directly for that one)
Carbon Fiber twin turbo GTO project - Link Thunder because nothing else runs DUAL throttle by wire on this crazy V12
I was recently asked how to remove a stock turbo. I almost said just folow the BGB, but there are a few tips that aren't in there. Plus most of us have downpipes by now so here is how I do it:
First, I am assuning you have a downpipe and not the stock elbow/cat assembly.
1. remove any intake/AFM, etc.
2. remove the manifold heat shield. There are two 12mm head bolts on the manifold and one on the turbo. Apply penetrating lube to all the exhaust studs/nuts on the manifold.
3. Jack up the car and safely secure it with jackstands
4. crawl underneath and remove the oil drain elbow. It's rubber on a gen2, aluminum on a gen3. Be careful because the rubber part is no longer available. There is also one 14mm bolt holding the drain pipe to the block. Remove that too.
5. remove the three downpipe botls/nuts and downpipe bracket if you have one.
6. remove the L shaped turbo bracket if you have one
7. get out, lower the car back down
8. remove any wastegate or boost controller hoses
9. remove the bolt that holds the water pipe to the wastegate bracket.
10. remove the two 10mm nuts that hold the water pipe to the turbocharger. Flex the pipe out of the way. If the hoses tear or leak, well they were old and you needed to replace them anyway. This step will leak some coolant so try to catch it. It won't be more than about a quart though.
11. Use a 27mm socket on a gen2 or a 17mm on a gen3, universal joint, a long extension and a 1/2 inch breaker bar to remove the oil feed fitting from above. You can just barely get through in the space that the water pipe used to be in.
12. remove the 7 or 9 14mm exhaust manifold/head nuts. I like to use a cordless impact gun whenever possible as it seems less likely to break the studs.
13. at this point the turbo should be loose. You will probably need help because it's heavy, but the goal is to remove the turbo, maniflold, downpipe, oil drain/feed assembly as one piece. Slide it forward on the exhaust studs and lift. You may have to adjust your technique slightly as the downpipe flange likes to catch on stuff down low.
Installation is basicaly the reverse of removal. Don't forget to top off coolant.
Here is the basic run down of how we treat warranties.
New motors - 1 year warranty on everything. This does not include oiling problems (bad oil, lack of oil, etc). This also does not cover tuning problems like too much boost, lack of fuel, or lack of octane.
Rebuilt turbos like CT16, CT21, CT27, and upgraded CT26's - six months from date of shipping. Unlimited mileage. Warranty does not cover oiling problems such as oil contamination, or using the wrong oil. If there is an argument that your oil was "good enough" then we will request that you send a sample to Blackstone for proof. This has actually saved people money in the past because they have found out their rod bearings were failing and sending shrapnel into the turbo through the oiling system. The oil test caught it before the rod knock fully developed and potentially sent a rod through the block. Turbos have to be sent back to ATS for inspection or repair.
New turbo kits - the kit has a 1 year warranty EXCEPT the turbo. The turbo would be covered by Garrett or Precision. Garrett offers absolutely no warranty on any of their turbos. I know that sounds scary, but I can count the number of defective or worn out GT series turbo I have seen in twenty years on one hand. Kits have to be sent back to ATS for inspection or repair.
Engine swaps - 30 days. This also does not cover tuning problems like too much boost, lack of fuel, or lack of octane. We dyno test every swap when it's complete. So as long as you don't go crank up the boost controller you should be fine. Does not cover oil leaks on any seal that is not new and replaced at the time of the swap. For example, we install a timing belt kit with new cam seals and one seal leaks. You are covered. Let's say you forgo the timing belt job on the swap and once it's installed we find out the cam seal is bad. You are not covered.
Other stuff - these cars are old. An engine rebuild, or engine swap is not a new car or a new car guarantee. For example if your fuel tank is rusty and clogs up the fuel pump/fuel filter and causes the engine to run lean that is not the fault of the new motor and is not covered under any warranty.
Travel/distance – It's up to you to get the defective part/car/etc back to ATS Racing. On very rare occasions we have authorized another shop to do warranty work. It would absolutely have to be a top tier MR2 shop such as TCS or KO Racing that we have a preexisting relationship with.
Parts – all parts are covered by their manufacturer's warranty. If they don't have a warranty then you don't have a warranty. Sorry.
Labor – We warranty our labor on parts we install for one year. So if I put a new alternator on your car and the nut comes loose on the 364th day, bring the car back to me and I will fix that. If you brought me a used alternator and wanted me to install it for you and 364 days alter the nut came loose, well I'm going to cover that too because it was my mistake that allowed the nut to leave here too loose. If you brought me a new alternator to install and it fails the very next day, that is on you unless the failure was because of an installation error on my part.
No other warranties are expressed or implied.
If you have read this far I probably owe it to you to explain why after 20 years in business I have to explain this.....a client in Italy is demanding a warranty on his turbo that he purchased and installed EIGHT YEARS AGO. Like dude, even new car warranties aren't that long. Feel free to compare our warranty policies with any other performance shop in the world. You will most likely find that we are on par or better in every way.
Unfortunately I need to put a reminder here about storage fees. It's pretty simple - If your car is here and you have paid your outstanding bill - no storage fees for 30 days (I am flexible on this and often extend this deadline, just let me know). Once we are done with your car, the full payment is due within 72 hours. After 72 hours storage fees at a very reasonable $30/day start to accrue. This is every day, not just business days. On larger projects we may ask for payments along the way. If you do not pay within 72 hours of our request then work stops on your vehicle and storage fees start 48 hours after that (so basically 5 days total). If you have questions about storage fees please email sales@atsracing.net
Withholding information - simply don't do it. We have had a rash of this lately of people who don't bother to mention that their 1991 MR2 has a gen5 motor in it, or that the MR2 part they ordered is being installed in a converted ST182 Celica or that the Gen2 turbo kit they ordered is supposed fit an AW11. That stuff isn't normal and we cannot psychically obtain that information reliably. You need to let us know these things or you are going to get the wrong parts. We are US based, the "normal" for us is a 1991-1995 Gen2 MR2 Turbo. If your car or motor or transmission is differnet and it's not already covered in the item description please let us know so that we can do our best to get you the right parts.
We've shared some pretty good stuff over the years.
Shopping list for a 450whp 3SGTE: http://atsracing.net/Blog/View/26
360whp Gen4/Gen5 on E85: http://atsracing.net/Blog/View/28
3SGTE Horsepower Basics: http://atsracing.net/Blog/View/23
What oil should I use?: http://atsracing.net/Blog/View/31
Core Return Instructions: http://atsracing.net/Blog/View/29
Engine Break In Instructions: http://atsracing.net/Blog/View/27
Scroll though all of them when you have time, but I'll do my best to keep this list of popular ones at the top.
Thanks,
Aaron
Not, MR2 specific, but MR2's aren't all we do anymore. I needed a place to summarize all the modifications done to my 1978 Ferrari 308, and share some of its story.
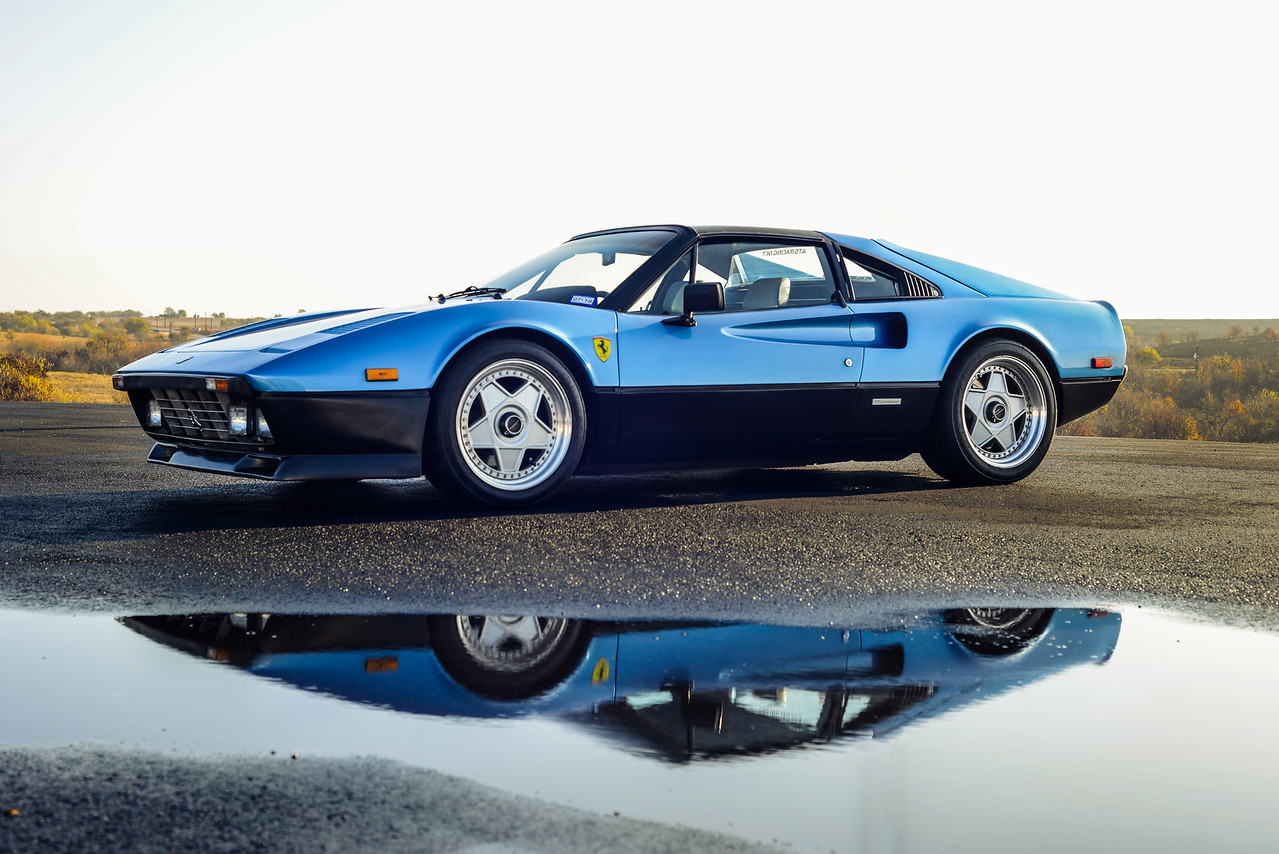
(Photo credit to Mason Bleasdell)
The current modification list (11/1/2020)
Engine/Drivetrain
rebuilt transmission (but otherwise stock)
chromoly CV joints, inner and outer
Custom clutch using a V12 Daytona pressure plate, Centrifugal style weights (taken from a Centerforce clutch for a Mustang), Kevlar disk, and a stock flywheel
308 QV block with steel sleeves bored to 81.5mm, sleeves have grooves for stainless wire rings to seal against the head gaskets. If/when I do this again I will add a larger diameter o-ring to the head to get an interlock between them
348 heads with custom cams (and a ton of duration, currently it pulls only about 6" of vacuum at idle)
Custom Wiseco 81.5mm pistons with approx. 12:1 compression ratio
Carillo Rods
Stock crankshaft
Copper head gaskets
328 oil pump
328 intake runners, ported to match the 348 heads
308 QV intake plenum
2019 Toyota Tundra 85mm electronic throttle body
Custom Aluminum radiator up front with Maradyne 9" fans (about 30lbs lighter than the stock radiator)
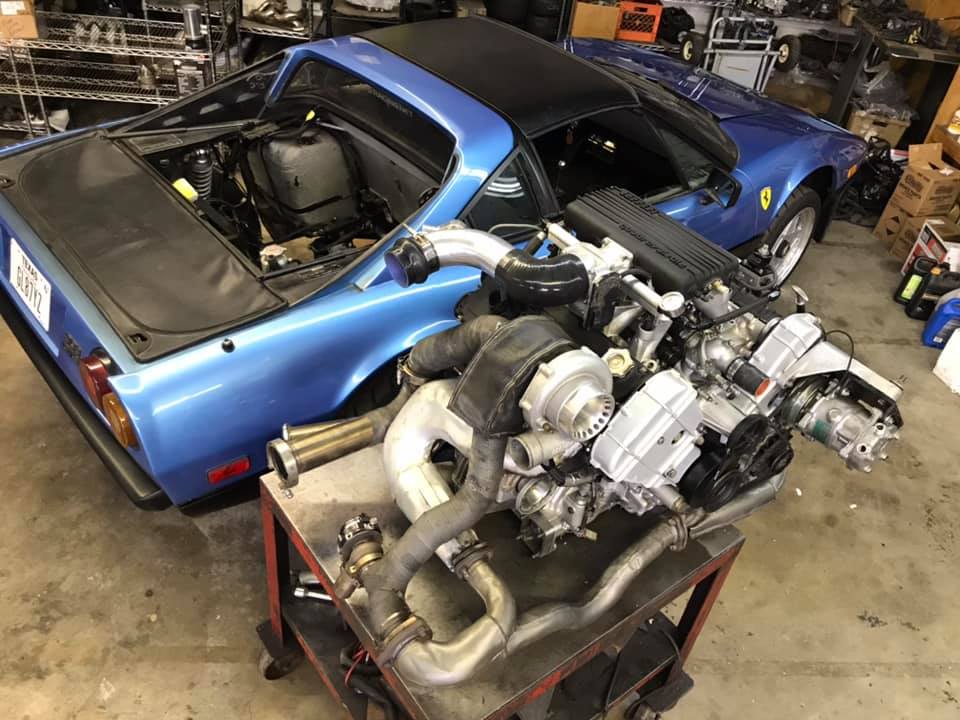
Turbo kit and exhaust
Precision 6466 billet wheel ball bearing T4 turbo with .82 exh housing
Kit uses stock US style 328 exhaust manifolds and Y pipe, turbo is mounted to a 2.5" J pipe that puts the turbo about where the 308/328 fuel injection meter would be.
3" downpipe out of the turbo into a Y pipe with an electric exhaust cut out. The other branch of the Y leads to a Summit 3" muffler. Currently there are two exhaust outlets (one muffled, one optionally open), but I have plans to redo the back of the exhaust into a more Ferrari like 4 tips.
Water to air intercooler mounted in the trunk. There is a radiator heat exchanger positioned between the exhaust tips. Wrapping the muffler in header wrap cut heat in this area and allows IC temps to stay reasonable.
A K&N filter behind the passenger side intake vent feeds the turbo through a 3.5" aluminum intake pipe
A rare, discontinued ZEN blow off valve is mounted on the cold side intercooler pipe
ECU, electronics, and electrics
Rebuilt stock alternator. My rebuilder was able to upgrade the internals to about 75amp (stock is 55)
Link G4+ Storm ECU with external throttle by wire module (I plan to change this to a Link G4 Extreme soon)
875cc high impedance top feed injectors using custom fuel rails and adjustable fuel pressure regulator
AEM 044 style fuel external fuel pump mounted near driver's side fuel tank
Toyota Tundra throttle body (electronic, no throttle cable)
Toyota MR2 MAP sensor (actually this is an aftermarket 4 bar unit)
GM style fast response intake air temp sensor mounted in original cold start injector spot
GM style water temp sensor mounted in the valley of the block
GM Flex Fuel sensor
Ferrari 360 throttle pedal
Toyota Tundra Denso Ignition coils (eight of them, no distributor)
Cam trigger is an aluminum wheel with a magnet in it that is attached to the end of the 348 cam, Sensor is a Norwood unit
Crank trigger uses a stock 308QV sensor on the flywheel, but the flywheel was modified to have 12 pins on the back (stock injected cars have two pins). I may change this to a 36-1 or 60-2 crank trigger later
Perfect Tuning CAN gauge replaces the factory water temp gauge and gives me instant access to (almost) all the ECU sensors and outputs, I typically have it set to view coolant temp, intake air temp, voltage, and manifold pressure
Performance:
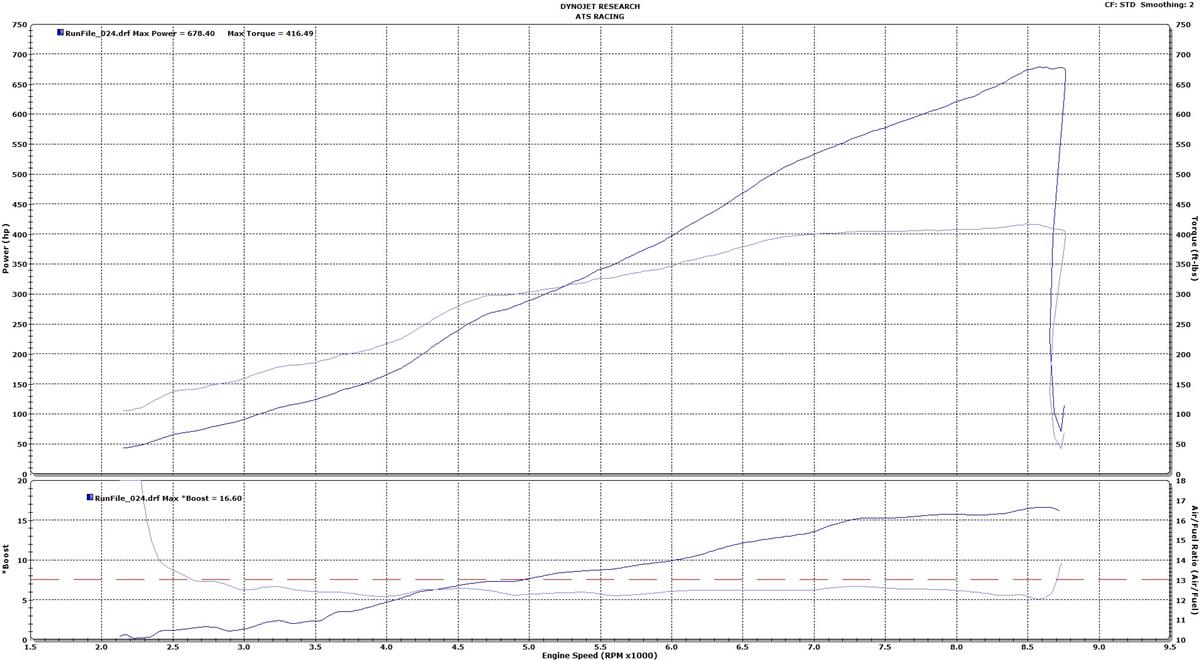
The engine is tuned for flex fuel and can run on 93 pump fuel or E85 Ethanol. On pump gas we have to keep the boost and timing pretty low because of the high compression ratio, but we still make a respectable 420whp at 5 psi. E85 is where the real fun is. On E85 at 16.5psi we make 678whp! With a 15% drivetrain loss (measured results on other Ferrari's is actually closer to 19%) we are at 800 flywheel horsepower. The torque is slightly limited because we were getting some clutch slip on the dyno (Kevlar disks take FOREVER to break in). I don't have to tell you that 678whp. 800 horsepower in a 3000 pound car is incredible. We tuned the boost to be both rpm and throttle dependent to make the power curve as predictable as possible. You can see it's very linear and looks similar to a 355, but on steroids.
Suspension, brake and body modifications after the dyno graph and engine pics


Body and wheel modifications
288 GTO style front airdam, foglights, front bumper and turn signals (I'd guess this saves 40lbs over the US bumber), and a grille that I hand made.
Euro style rear bumper (about 45 pounds saved here)
I cut the stock 1/4 window louvers out to look more like a GTB
Autostrada Modena 17x8.5 and 17x9 inch wheels with Toyo R888 225/45R17 front tires and 255/40R17 rears. These are mounted using adapter/spacers to get the correct fit. We machined custom sleeves to make them hubcentric.
Brakes
Girodisk front brake kit, I tried their complete kit with rear rotors, but the front brakes severely overpowered the rear brakes. I think I'm using an EBC red pad up front
Superformance rear brake kit with EBC yellow pads. I went with a slightly more aggressive pad to get the balance perfect. I still can't get their parking brake kit to work very well, the 1978 style cable routing just doesn't seem compatible.
Suspension
QA-1 coil overs with surprisingly soft springs. I think I went with 200/225 rates. I could probably go stiffer, but I really like the ride quality.
Poly bushings everywhere, plus all the ball joints, tie rods, and steering rack were replaced in 2016.
I have a Superformance quick ratio rack that I have not assembled or installed yet.
The aluminum calipers and two piece rotos saved about 40lbs off the car
Stereo and AC
Sanden style AC compressor, all new lines/hoses, condenser, fan, etc. Only the ducting and the evaporator remain from the original AC. My center vent is actually a 928 door vent and flows more air than the original 308 vent. Sanden compressor and bracket weigh 10 pounds less than the original York.
Alpine CD head unit with ipod control (old, like 2006 model), Clarion door speakers, and small JL 3 channel amp under the passenger seat, and a 8" JL sub in a custom box positioned where the original EGT sensor control boxes were at the front of the passenger footwell.
Other links:
Smoking Tire One Take video: (skip to :44 to avoid watch advertisement) https://www.youtube.com/watch?v=ruBJ-MnYXis
Eagles Canyon Drive By: https://www.youtube.com/watch?v=KKYSGFe5pkE
RetroMod cars feature article: http://www.retromodcars.com/features/beautiful-beast
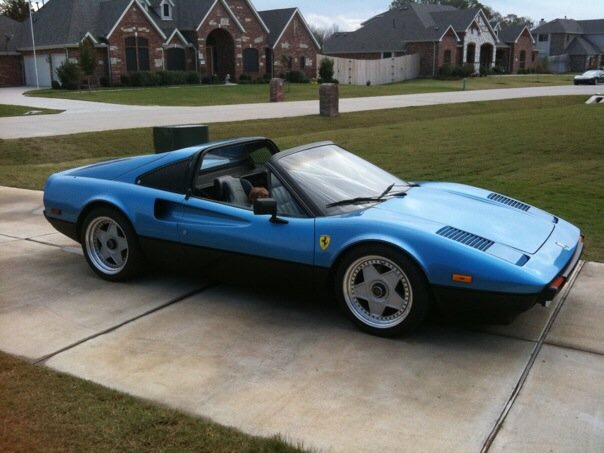
How I got it, the short version. The car belonged to a lifelong family friend and fraternity brother. He and his family died in an incredibly tragic plane crash in 2006. Our last conversation had been that he wanted me to work on the car, make a few improvements and make it a little faster. I spoke to his family and carefully brought up the car. His father replied "I was hoping you would ask about that." He allowed me to purchase the car from Jason's estate. I bought the car sight unseen. I didn't know it was blue. It was not running at the time, we had to tow it home from Wichita Falls.
I managed to get it running, replace a leaking fuel line, and do a basic tune up. I spent a lot of time on the dyno getting the ignition timing and carb settings as perfect as I could. The result was 187whp, not too bad for a car originally rated at 205 flywheel horsepower. I drove it like this off and on for eight years. Note the sleeping toddler in the passenger seat.
Rom Tune ECUs are no longer available. This pains me to write this, because this was one of our oldest and most famous products. We started selling these around 2005. Unfortunately, the “scramble chip” is no longer available and has been discontinued for years (like ten). I did my best to keep this product alive but we have finally run out of daughterboard inventory. There is a small group in the UK attempting to make a newer version, but so far it has not been compatible with the majority of US ecu’s.
We still have the hardware and software to do chip tuning, so if you have an ATS (or GForce) ecu we can still retune that for you. That page will remain active.
The bright side: We are changing our combo kits over to include plug and play ecu’s from Link and ECUMaster. We have been working with these brands for many years. They have great quality products that are easy to install and easy to use. We will be including base maps, but because these ecu’s are MAP based and not AFM based they will not automatically compensate for airflow changes like the rom tune so a wideband O2 sensor is mandatory for you to verify your tune. We also highly recommend our flat response knock sensor because the stock knock sensor is too noisy to provide viable information. The LINK pnp ECU fits inside the stock ecu case and is basically undectable when installed.
The brighter side: These are REAL ECU’s that are not locked or encrypted so they can grow with you and your needs. The ECUMaster EMU is the same ecu that I use on my 800+whp MR2. They are both MAP sensor based and eliminate the AFM. The Link can use the stock turbo pressure sensor up to 17psi of boost (3 and 4 bar map sensors available on the ECU accessory page), and the ECUMaster has a built in 4 bar MAP sensor that can read up to 45psi of boost! Both ECU’s can accept flex fuel sensors so E85 tuning is also possible (we typically see 360whp on a stock motor with CT27 and E85!!).
Over the next few days I will be updating our combo kits and their options.
Note - as of 9/23/2020 I have enough parts left to build 1 or 2 rom tunes. If you absolutely have to have one and cannot use a stand alone ecu then please email us at sales@atsracing.net
It has been a few years since I shared the article from Forced Performance on oil choices.We have been recommending Valvoline VR1 since even before that article. With the help of Daniel Satnik we have made some additional discoveries since then.
Even though Valvoline VR1 10W30 and Valvoline 20W50 show the same zinc content, the 20W50 has a stronger film strength that will offer more protection for your turbo. We are now recommending VR1 20W50 for anyone running over 17psi of boost/300whp.
Another thing we run into is: My upgraded turbo died after one week, but my old CT26 was still running fine on the same bad oil for 30 years. I'll admit this one stumped me for a while, but I think I have a handle on it. "Work Hardening" Basically the original turbo bearings were subjected to a fairly casual start of life, running stock boost for tens of thousands of miles. While this was happening the turbo was getting heat cycled over and over and over. This basically heat treated the soft brass bearings into something harder and stronger. New/rebuilt turbos are often subjected to immediate high loads/high boost. We are now suggesting a 500 mile break in at the lowest boost level you can run/10psi. This will give the new bearings some heat cycles and allow them to harden up a little.
Rotella Diesel Oil. I don't use it. I don't have an opinion of it. I don't really understand the appeal except that everyone tells me how cheap it is. I know it's $19/gallon, but six quarts of VR1 20W50 is currently only $33 shipped from Amazon. That's $22/gallon. Surely protecting your engine and turbo is worth the extra $3?
UPDATE: OK, so this opened up a few questions. First, I am personally using the conventional VR1. It's about half the price of the synthetic, and offers excellent protection. The synthetic might last longer between oil changes, but otherwise I don't see a need or value in it. I recommend changing at 2500-3000 mile intervals.
Oil recommendations:
Stock - VR1 10W30 probably more protection than you need, but it's not a condom you aren't missing any sensation.
mild - up to 16.5psi and 299whp - VR1 10W30 has proven fine for these cars
maxing out the stock motor - 300+whp and 17+ psi - This is where I start switching to VR1 20W50
EXCEPTION #1 - ball bearing turbos don't need the thicker 20W50 oil so we actually run them up to about 450whp on VR1 10W30
EXCEPTION #2 - all ATS 2.3 stroker motors are built for 20W50 oil.
EXCEPTION #3 - Altitude. Thinner air requires more turbo rpm. Anyone above 4000ft elevation should be running 20W50. Just be sure to let the engine warm up before aggressive driving.
Happy Boosting,
Aaron
We recently regained control over shipping rates. We are using UPS for most international shipments and have negotiated lower prices. I have updated the web page to reflect this. In the past we have continued to refund the shipping costs when our website was wrong. We will continue to do this. In the case of some bulky or heavy items we may need to charge more shipping than the website calculates (the current algorithm is based on price, not weight/size).
Thanks,
Aaron
Core return forms are mandatory to receive core credit. We have been getting too many random cores shipped from UPS stores (or similar) that we have no way of tracking down the sender/owner. If you are not sure how to package your cores properly, then pay the deposit and wait until you get your new parts. They will come in a quality box with quality packing materials that can be reused.
Several years ago Prime made the Gen4 swap extremely popular. Ironically they don't work on cars anymore, but the Gen4 and later Gen5 motors are here to stay. Just to quickly touch on both motors, they are very similar to the Gen3 but with more advanced ecu's, and coil on plug ignition systems. The bad news is that they come with smaller turbos (think original CT26 combined with CT20B exhaust wheel), and the weakest rods (and blocks) of any 3S motor.
Don't let that last sentence scare you too much. The block can handle 450whp/350lb ft of torque and the rods can handle about 300lb ft of torque.
The gen4 has a side feed intake manifold. The gen5 has an even more advanced ecu that has an immobilizer built in, extended tip injectors, and surprisingly went back to a center feed intake manifold.
The swaps can be done pretty cheaply; our basic, basic swap starts at $3800 installed. But what we usually do should probably be described as Basic++ We start with the Basic swap, add a side mount intercooler kit, downpipe, exhaust, fuel pump, maintenance package, and clutch package. The total is around $6500. This typically gets you 260whp/320 horsepower. That's enough for low 13's in the ¼ mile and 0-60 in about 4.7 seconds.
So what's the next step? Turbo, ECU and fuel. Let's hope you have E85 available near you because I personally don't like methanol injection, I've yet to see it last reliably. E85 has an effective octane capability similar to C16 race fuel so we can run a lot more boost without the fear of detonation.
ATS developed a plug and play kit for the ecu and fuel system that matches well with the stock gen4/5 pistons and rods on E85.
http://www.atsracing.net/Parts/Details/ECUFlexFuel800
We paired our popular ECUMaster EMU with a custom set of 875cc high impedance top feed injectors that fit the stock rail. These will support 385-400whp on E85. That's a little more than I like to push the stock gen4/gen5 motors.
Combine that fuel system with our Sweet16/CT16 turbocharger upgrade and you've got a FAST spooling setup capable of 300whp on pump gas and 360whp on E85.Be sure to run a high zinc oil like Valvoline VR1 with this setup because you'll be making almost twice the original power and limited to a stock type thrust bearing in the turbocharger. GT/GTX series ball bearing turbo kits are also possible if you source a Gen3 exhaust manifold.
360whp is ~450 flywheel horsepower. That's enough to push a 2800lb MR2 deep into 12 second ¼ mile times even on street tires. These turbo's spool so fast that torque management in the ecu boost control strategy is a must. Basically use the EMU to build a boost curve that keeps the torque right about 315 max and you'll be fine.
Happy Boosting.
Recently I've had a few people ask about engine break in. This is a touchy subject as everyone believes they know the right way. Here is what we recommend:
Check and fill all your fluids. We highly recommend Valvoline VR1 10W30 for stock to 400whp rebuilds, and 20W-50 for anything over 400whp. Start the car and let it run for about 30 minutes. Be sure to check for leaks. If there are any leaks, stop the car, fix them and start over. Watch the temp gauge, make sure the fans turn on at an appropriate time/temperature. After 30 minutes turn it off an let it cool off. Once it is safe to do so check your coolant level and change the oil and filter. Now drive 100 miles. Be as gentle or as hard as you want. Personally I prefer hard as I usually do this part on the dyno. After 100 miles change the oil and filter. Now drive 1000 more miles and change the oil and filter again. Then 2000 more miles and change the oil and filter again. At this point you’ll have a little over 3000 miles on your new motor and you can change to a synthetic oil if you want. Personally I stay with the conventional and just change it more often (about 2000 mile intervals instead of 3000)
Aaron Bunch
ATS Racing and Exotics
With the publicity of Matt Farah recently driving Kenn Kite's ATS built 450whp MR2 we decided to put the recipe up there for people who want this build. The availability of E85 has made 450whp the sweet spot of bang for the buck MR2 performance. For example 450whp can happily run our $350 1200cc injectors instead of $1000+ ID2000's (now discontinued). 450whp is also the limit of the side mount intercooler, and stock intake manifold. 450whp is also the limit for a single disk clutch, so you get a $500 Stage 4 instead of a $1400 twin disk. And finally 450whp is the practical limit for the 3S block, beyond this number we suggest upgrading to the 5S block (update, we have seen Gen3/4/5 blocks crack at 400whp)
This E85 build will make about 330-350whp on pump gas. If you are trying to make 450whp on pump gas, well bad news.....it's going to cost a lot more because you need to do considerable flow modifications due to the limits of 93 octane.
The block. We highly recommend going to a 2.2 stroker motor. There is no power benefit, but there is a spool benefit and it makes the car a better daily driver. The cost difference between a stroker and a forged 2.0 is pretty minimal. So buy this and upgrade to the Eagle rods and ACL Race bearings for a little extra insurance:
http://atsracing.net/Parts/Index/ATS22STROKER Get the with Eagle rods and ACL Race bearing upgrades.
By the way I am assuming we are doing the installation here, so no need for a core deposit.
Next thing is the Cylinder head:
http://atsracing.net/Parts/Index/ATSHEAD
and these:
http://atsracing.net/Parts/Index/CAMS
Get the Gen2 S1 cams. I don't care if you have a Gen3, Gen4, Gen5, The GEN2 S1 cams are the ones you want. They spool faster and make the same peak power at this level.
Get ATS cam gears too: http://atsracing.net/Parts/Details/E-ATSCAMGEARS
The price of cams is changing soon because GSC is going to billet blanks, but this head with cams and cam gears should be around $2000 total.
Get the ATS head gasket repair kit here: http://atsracing.net/Parts/Details/TU-HG-KIT
That will get you a set of ARP head studs, ATS metal head gasket and a low temp thermostat.
You will also want:
http://atsracing.net/Parts/Details/TU-OILLEAK Oil leak kit
http://atsracing.net/Parts/Details/TU-TIMING-BELT Timing belt kit with seals
http://atsracing.net/Parts/Details/TU-IGNITION-91 Tune up kit
http://atsracing.net/Parts/Details/E-OILPUMP HV Oil pump with gasket
5SFE flywheel bolt set
Machine stock flywheel for stroker, plus resurface flywheel $200
I don't have a water pump on the website yet, but they are about $150 for genuine Toyota. I have found the aftermarket ones come as only the front half and they tend to leak, plus we have seen off brand ones that had the impeller installed at the wrong depth and cuased serious flow issues.
On to the turbo kit: ATS Racing Garrett GT3071R. This thing spools very close to stock and will make just over 500whp if pushed.
http://atsracing.net/Parts/Index/GTSERIES
The turbo kit comes with all the gaskets you need IF you can reuse your manifold gaskets. Just in case they aren't reusable here are the two:
http://atsracing.net/Parts/Details/TUR-CT26INLETGASKET manifold/adapter gasket
http://atsracing.net/Parts/Details/TUR-MANIFOLDGASKET gen2 exhaust manifold gasket
The ATS Top Mount Intercooler kit also includes a 3” intake that deletes the factory AFM. This intercooler is the best air/air solution available without cutting your trunk or going to a heavier and more expensive water to air intercooler package.
Get the optional Tial BOV, because it sounds cool.
http://atsracing.net/Parts/Details/ICBOV-ATS-TOPMIC
The ECU and fuel system is easy because I built a combo kit that has everything you need:
http://atsracing.net/Parts/Details/ECUFlexFuel1200
Drivetrain: I hope your stock E153 transmission is in good shape, because rebuilding them has become nearly impossible or expensive or both. Grab an ATS Racing Stage 4 clutch and a set of our CV joints:
http://atsracing.net/Parts/Details/DT-CM-STG4 Stage 4 clutch
http://atsracing.net/Parts/Details/DT-CVJOINTS ATS inner CV joints
http://atsracing.net/Parts/Details/DT-TRFLUID-MT90 Transmission refill kit
Budget about $150 for fluids like VR1 race oil, oil filter, coolant, clutch fluid.
If we do everything at once the total labor for engine removal, disassembly, cleaning, reassembly, is typically $5100, tuning for flex fuel is $1500. So assuming you don't have a car loaded with gremlins and previous problems your total price is about $25,000
450whp is approximately 570 flywheel horsepower. Flip through the latest Car and Driver and find the list of 570hp new cars. It's pretty short. Now look and see how many of them are under 3000 pounds. 570 horsepower/3000 pounds puts the MR2 in an incredible power to weight class. At this power level the car is capable of 10 second quarter mile times on drag radials, but still has the drivability and reliability of the stock car. The one pictured above was build by ATS in 2009 and is still going strong today..
Recently I was asked for a recipe to take a 1991-1995 Toyota MR2 from bone stock (160whp) to 350whp on 93 octane pump gas. This is more than double the output of the stock motor. Believe it or not, it's possible. Here are the parts I would recommend:
GT3071R turbocharger kit
ATS ECUMaster ECU
550cc side feed injectors
Walbro fuel pump
170 degree t-stat
ATS modified fuel rail
Open element air filter - Apexi, or K&N. Do not use Blitz or HKS foam filters. They degrade rapidly, do not filter or flow well
ATS throttle body inlet - 91-92 only, the 93+ already has an ample sized inlet.
3" exhaust - the Ebay ones flow great, but tend to drone on the freeway. Berk is better about drone, but twice the cost. TCS is my go to exhaust supplier though. They have quiet options or flashy options.
GSC/HKS/BC 264-268 degree cams
ATS adjustable cam gears
ATS Side Mount Intercooler with fan and shroud kit - I would prefer to use the top mount, but I put budget in the subject.
Total parts cost is about $7000. I have done this recipe many times over the years. The worst I have seen from this is 330whp and the best I have seen is 360whp. Now, if I had a little bit more in the budget the first thing I would change the fuel system, I would run a top feed rail and 1200cc top feed injectors. By switching to these items you open youself up to the possibility of E85 and lots more horsepower in the future.
We are also going to assume you have kept up with maintenance. So no 150,000 mile timing belts, no knocking, no overheating, no puking oil. No smoking. A few drips of oil here and there are acceptable (sometimes I think MR2 means "leaks oil" in Japanese).
The stock ignition system is really good on a 3SGTE. You will find lots of old articles about cap/rotor wear etc. Those were wrong. We routinely make over 700whp on basically stock ignition systems, and field tons of "help me" calls about malfunctioning aftermarket coil on plug systems. Coil on plug systems are available, but require stand alone EFI and additional hardware. That adds up to money that could be put to good use elsewhere.
ATS sells a full tune up kit here (for 91-92) or here (93+). The included NGK plugs are pre-gapped a little bit too big. They will work for stock applications just fine, but we suggest dropping the gap down to .028 inches. While you are changing the spark plugs you should take the extra time to do a compression test. This is a good basic indicator of piston/ring condition. You are looking for 140-185 psi of compression. And it's very important that they are all within 5% of each other. Compression testers are available at your local autoparts store for under $30.
Your car will be louder now. If you are not comfortable with a louder than stock car then sell it and go buy a hybrid. Removing breathing restrictions is fundamental to making power. There are some quiet exhausts occasionally available on the market, but everything will be at least slightly louder than stock.
Intake: You've got a few choices here. You can go with an Apexi bolt in open element air filter like here. They flow great and still filter well. Or you can make your own with parts off ebay. Be sure you have the skills and patience to make a bracket, otherwise your filter will beat itself to death on the fuel filler pipe, quickly develop a hole, and no longer filter. Filters from HKS, Blitz foam, and Greddy Airnex should be avoided.
What a cheap freebie? Take the stock air box base, cut or drill more openings, specifically on the front and outside sides. Remove the stock air bladder from the firewall and reinstall with a new genuine TOYOTA air filter. Be careful to leave enough base material that it can still be bolted down. This flows great, and filters as well as OEM.
Exhaust: The $199 Ebay dual muffler dual tip exhaust flows awesome. We have seen 800whp from these before. Seriously. The bad news is that they are LOUD, especially when combined with downpipes and larger aftermarket turbos. The Berk exhaust does not flow as well, but is much quieter. TCS occasionally offers two exhausts: a quiet SP style exhaust that looks like a 3" version of stock. This is my favorite. It's difficult to make it fit perfectly, but it is quiet and flows reasonably well. The other TCS is the 3.5" dual muffler, dual tip, it's beautiful and BOLD (read: loud).
Downpipes: I'll get to those later. An exhaust can be changed out in about 2 hours at home. A downpipe takes 2-3 times that amount of time. I will also note that adding performance exhaust parts like a downpipe or a 2.75" b-pipe in front of a stock muffler is dumb. There is almost no gain in power because you still have a big restriction at the end. ATS Throttle Body Inlet–hey, it's my page I can push my own products if I want–The 1991-1992 cars NEED this. It's a 4-5 horsepower gain. Want proof that it helps? Well the 1993-1995 cars have a redesigned throttle body inlet that mirrors ours.
You have three choices (for now) based on budget. There is almost ZERO natural air flow through the stock intercooler.
So a quick FREE modification is to unplug the temperature sensor on the engine lid. This will force the factory intercooler fan to be on anytime the engine is running (or key is in the on position).
Upgrade the fan. An 8” puller fan will fit on the engine bay side of the intercooler. These are $99. The install takes about an hour and hopefully you know someone with small hands willing to help you install the push lock mounting tabs. If you have the motor out, or you feel like punishing yourself you can fit a 9” pusher fan on the front side of the intercooler. It sounds like just 1” bigger, but it flows about 30% more air!
The ATS Side Mount Intercooler kit. These are on sale for $499. This upgrades you to a higher flowing, more efficient core, plus you get cool piping upgrades, a 9” fan with shroud as well as a mounting shroud to make sure we are getting the maximum flow possible through this core.
If you are shooting for more than 350whp in the long term will will outgrow all these options, but you will also outgrow the stock ECU, fuel system, stock pistons, etc, etc...there is already another blog about that.
Step 4: More boost. Finally we get to the good stuff. The stock MR2 runs about 9-11 psi in stock form. If you have been following this path you may have a car running as much as 13 psi even without a boost controller. First, buy a gauge. It doesn't have to be fancy, but avoid brands like GlowShift and Prosport (I've seen more broken ones than working ones). I like VDO, Autometer, and any of the big Japanese brands. Some electronic boost controllers have built in gauges, so that can offset some of the cost.
You will also have to disable fuel cut if you have a 91-92 car and want to run more than 12 psi. The 93+ cars have a fuel cut set right about 16 psi. For stock turbo people on pump gas, this is usually plenty. You can buy a fancy FCD (fuel cut defenser) or do a $5 zener (pronounced Zee ner) diode mod if you are handy with a soldering iron. Or you can just disconnect the vacuum hose that goes to the stock map sensor. That sensor does only two things: it runs the stock (useless) boost gauge and it activates fuel cut. Leave it electrically plugged in, remove and cap/plug the vacuum hose and voila: no fuel cut. Now to actually raise boost you will need a boost controller. Basically the stock turbo has a 7 psi wastegate actuator. When boost hits 7 psi the actuator opens up and routes exhaust around the turbine wheel to control the boost. The factory setup has a turbo VSV that bleeds off approximately 3 psi if all conditions are met (warm enough outside, warm enough coolant temp, no recent knock detections). This is typically disabled when you install an aftermarket boost controller. Again here are several choices in order of price:
Manual boost controller. The ATS MBC is a ball spring type for fast spool and accurate boost control. Not bad for $49. However expect boost to fall off 1-3 psi by redline with most turbos. This is because the exhaust back pressure increases inside the turbine housing and pushes on the wastegate flapper door. The ball-spring boost controller cannot compensate for this additional pressure on the wastegate flapper.
Electronic Boost controllers. These race in cost from about $329 to $600+. Greddy, HKS, Apexi, and Blitz all make or made electronic boost controllers. The old Greddy Profec B Spec 2 is probably the easiest to use ever, and the Apexi AVC-R has the most features, but is the hardest to setup. The HKS EVC4 has a somewhat difficult initial setup, but after that it is VERY EASY to change. I think it's the only one that you can actually just tell it what boost you want to run and it does the best it can to hold that boost all the way to redline regardless of gear.
Now before you go drop $600 on a new electronic boost controller, realize that is more than half the cost of a good stand alone ECU that will have boost control built it, or available as an inexpensive option. However stand alone ecu's require tuning and unless you do it yourself, that isn't free. Typically budget about $2000 for a full stand alone ecu with tuning and options (knock sensor, boost control, wideband)
So what is a safe boost level? Well that depends. On US 93 octane pump gas we typically quote 17 psi as the maximum safe boost level. The fact that 93+ cars had a 16psi fuel cut from the factory seems to agree with this number. However, as these cars get older we have seen some with excessive carbon build up that couldn't handle more than 13 psi before we heard detonation. I highly suggest renting some local dyno time so you can see how the car behaves under controlled conditions.
Step 5: Gauges: I already mentioned in step 4 that a boost gauge is necessary. The other gauge I recommend is a wideband O2 sensor. This will give you some insight into what the ECU is thinking as well as early detection of problems. There are lots of brands, Innovate is one of the biggest, and one of the worst. They eat sensors for breakfast. We have had excellent luck with PLX, Zeitronix, AEM, and recently a very affordable one from APSX. All of these have outputs that can be integrated into stand alone ecu's for later tuning use. Zeitronix and PLX offer logging software that can be VERY useful, especially if you are trying to street tune. So expect results of 14.7 at idle and cruise, and 10:1 at full boost. 11:1 is good (and safe) for full boost under most conditions, but you will need something to tune with to get there.
We've reached a fork in our path. You can proceed to step 6a or 6b, or choose to do both depending on your budget.
Step 6a: Tuning. The way we have laid out (and limited) these modifications you can stop at any point and still have a great running car. This step is really about optimizing it all and getting the most out of the investment you have made. Again, choices are laid out in order of cost:
nothing. It all runs pretty good as-is.
Piggybacks. Way back in the day we thought these could be the answer. Drop in some 20% larger injectors, and use an AFC to dial back the air flow meter signal 25% to correct the fuel map. The only problem is that the Air Flow Meter also effects the ignition timing map. So everytime we reduced the signal to lean out the air fuel ratio, we advanced the timing a little. This wasn't good. There is another complication that we didn't know about until we started doing rom tunes. There are TWO fuel and timing maps inside the ECU. When they ecu detects excessive knock it switches to a richer fuel map and more retarded ignition map. Even when tuning on a dyno it's almost impossible to know when this happens. Many tuners went along unaware and optimized the car to run great in it's limp mode...sounds fine until one cool day the car comes out of limp mode and suddenly there is too little fuel, and too much timing, and snap there goes a piston ringland. So two simple rules: 1. avoid them, and if you just can't then 2. don't use more than 10% correction (unless you have a way to compensate for ignition changes).
Rom Tunes ($800)– We've done literally hundreds of these. There is a better description on the rom tune product page, but the short version is this allows us to change the actual fuel and timing maps inside the stock ecu. So instead of manipulating a sensor we are changing the way the ecu thinks. They come pre-tuned for your car based on cars we have already tuned at ATS.
Stand alone ecu ($1000-$2500)– This used to be a huge undertaking. We had to build a new engine harness, people weren't sure if they could keep AC, or cruise control, no one knew if power steering of ABS would even still work. That is all fixed now. Link and ECUMaster both offer plug-n-play ecu kits for the MR2 (we developed the pnp for the ECUMaster so it is exclusive to ATS Racing), and all the original accessories and options still work. These come with a base map and you should be able to start up and run with an hour.
These start at a very reasonable prices (about $1000) but will require tuning. If you can do this yourself then great, but if not then expect to spend $400-$1000 at a local tuner. The other part of the price is the options. Things like boost control, built in wide-band O2, flex-fuel, knock sensor, oil pressure sensor, fuel pressure sensor, bluetooth or wifi output can be added to the emu. The best part about stand alone ecu's is that they can grow with your car without needing to be replaced. I run my 872whp MR2 on the same $1000 EMU that we put on near stock MR2's. There are other brands available. My experience with AEM, Megasquirt, and Hydra Nemesis are to avoid them. They may have a lower initial cost, or be available used because someone else already figured out how much they suck.
Step 6b: turbocharger upgrades
1. CT27 (or CT21 if you have a Gen3). This is a stock turbo that is upgraded on BOTH sides for additional flow. We replace the original compressor wheel with a larger billet wheel, and machine the compressor housing to match. We don't publish the exact size because there are many competitors out there who are willing to just copy someone's work instead of doing actual research themselves. We also do a CNC machine operation to the exhaust housing that optimizes the merge of the twin entry volutes. Don't try this one at home though, because if you overshoot the cut by .5mm (that .02 inches) you will ruin the exhaust housing. Externally these look like stock turbos so they are very popular in states with serious emission laws.
If you are doing the work to install a new turbocharger you should also install a 3” downpipe at the same time. The ATS downpipe is ceramic coated stainless steel and the wastegate opening/flow has been verified with each one. Berk makes a downpipe too, but the wastegate openings of the turbocharger must be enlarged because of an inadequate design or you will have boost creep (uncontrollable boost beyond target).
If you intend to run more than 15 psi we recommend the billet wastegate actuator and a 15 psi spring. I mentioned before that back pressure becomes significant at higher boost levels and can actually push the stock 7psi wastegate flapper open on it's own regardless of what signal you are sending from your boost controller. Raising the base spring pressure of the actuator will help prevent this.
The CT27 typically makes 250-300whp on pump gas, 350whp on E85/race gas and the current balls out fully modified everything record is 389whp
GT28RS Disco Potato – basically a ball bearing version of the CT27. Similar performance with slightly faster spool. Great for autocross or track days.
GT3071R – literally one of my favorite turbochargers. I have run these at 250whp on a bone stock MR2 and I have run them at 500whp on a fully modified MR2. This turbo has a HUGE range of power, really fast spool, and can grow with your needs, Plus there are options to upgrade it like the new line of GTX billet wheels. I haven't done one yet, but a 550whp GT3071R is a possibility.